Showing posts with label Handmade Flower. Show all posts

Tuesday, August 30, 2011

Singed Edge Flower 4 Tutorial

Today we're making the yellow flower in bottom center of the above photo. 

Supplies:
Man-Made Fabric (here I've used polyester but any fabric such as satin, rayon, nylon, etc. will do)
For this flower, I've also used tulle and burlap
Hole Punch (if using a brad)
Scissors
Circle Templates or Dies (Find templates here)
Candle
Lighter or Matches
Brads or Buttons
Small Hole Punch
Tweezers
Bowl of Water for accidents

STEP 1: First you will cut 1 fabric circle of each size and each fabric except the smallest and  largest circle. Cut only the polyester and burlap out of the smallest circle size. Cut 1 layer of tulle out of the largest circle size. So for this flower, you will have 9 circles. You basically need 4 sizes, each one slightly bigger than the next. Here I’ve used 1 ½ inches, 2 inches,  2 ½ inches & 3 inches. (the tulle is very hard to see in the photo below)

STEP 2: Carefully hold the man-made fabric circles (NOT THE BURLAP - nothing good can come from mixing burlap and fire!!!!) next to the candle one at a time. You can use your fingers or the tweezers. The heat will melt the fabric on the edges. You are not trying to catch the fabric on fire, just melt the edges.  This is where your bowl of water comes in just in case the fabric catches on fire. Also singe the tulle this same way. Be careful when singeing your tulle, it shrinks up quickly. The tulle layers are cut a size bigger to account for this excess shrinkage. 
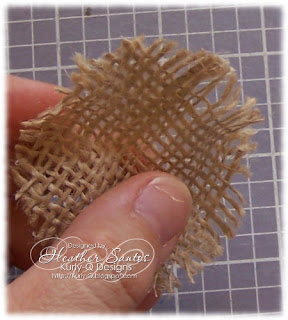
STEP 3: Next we will slightly distress the burlap. Simply wad it up in a ball, then open it up. Remove any stray strands that are hanging out of the edges.


STEP 4: Now just stack your circles from largest (on the bottom) to smallest. For this flower each layer had Burlap on the bottom, polyester in the middle and tulle on the top.

STEP 5: The final step is to fasten everything together. Here I've sewn a button on. You could also use a hole punch in the middle and stick a brad through all the layers. Then there's always glue. :)


Additional Tips:

  • This flower can be made with only 1 fabric per layer for a much simpler, lollipop look. (see the purple and pink flowers in the top photo)
  • You can adjust the sizes to fit your needs. The melting gets difficult when using sizes smaller than 1 inch.
  • I often make small matching flowers using less layers or smaller sizes of circles.
  • The softer, more flexible fabric requires more layers. Stiffer fabric requires fewer.
  • Try alternating fabric colors for the layers to match your color scheme.
  • These look great with only a layer of tulle added in between. Be careful when singeing your tulle, it shrinks up quickly. You may want to make your tulle layers a little bigger to account for this.
  • Use your ink or markers to color white fabric to match your design. Be sure to give the ink time to dry before you singe it though. Some inks (especially alcohol) are highly flammable when still wet.
  • Try adding Stickles or glimmer mist for additional accents.
  • Try attaching your flowers to hair clips, headbands, barrettes and brooch pins (for clothing or handbags).


Tuesday, June 21, 2011

Singed Flower 1 Tutorial

I've had requests for tutorials for the flowers I use on my cards. I LOVE making flowers for my cards. I often spend time making several batches so they are ready to go when I'm working on my cards.

Supplies:
Man-Made Fabric (here I've used satin but any fabric such as polyester, rayon, nylon, etc. will do)
Hole Punch
Scissors
Circle Templates or Dies (Find templates here)
Candle
Lighter or Matches
Brads or Buttons
Small Hole Punch
Tweezers
Bowl of Water for accidents


STEP 1: First you will cut 3 fabric circles of each size. You basically need a small circle and a larger circle. Here I’ve used 1 ½ inches & 2 ½ inches.


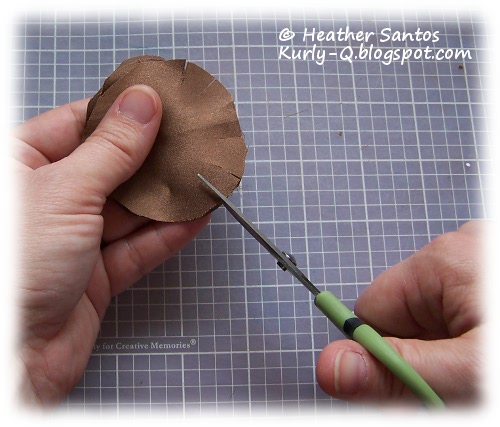
STEP 2:Cut slits in the edges of the circles going all the way around. I usually stack all three circles of the same size and cut all at once. These will be your petals.


STEP 3: Carefully hold the circles next to the candle one at a time. You can use your fingers or the tweezers. The heat will melt the fabric on the edges. You are not trying to catch the fabric on fire, just melt the edges.  This is where your bowl of water comes in just in case the fabric catches on fire.


STEP 4: Using your hole punch, place a hole in the center of each fabric circle. I do this with all 3 circles of the same size stacked together.


STEP 5: Stack the 3 smaller circles on top of the 3 larger circles.


STEP 6: Put your brad through all 6 layers.


Additional Tips:

  • You can adjust the sizes to fit your needs. The melting gets difficult when using sizes smaller than 1 inch.
  • I often make small matching flowers using only one size of circles.
  • The softer, more flexible fabric requires more layers. Stiffer fabric required fewer.
  • Try alternating fabric colors for the layers to match your color scheme.
  • These look great with a layer of tulle added in between. Be careful when singeing your tulle, it shrinks up quickly. You may want to make your tulle layers a little bigger to account for this.
  • Buttons also make a great center. Simply skip the hole punching step and sew on the button.
  • Use your ink or markers to color white fabric to match your design. Be sure to give the ink time to dry before you singe it though. Some inks (especially alcohol) are highly flammable when still wet.
  • Try attaching your flowers to hair clips, headbands, barrettes and brooch pins (for clothing or handbags).


Saturday, June 18, 2011

Sentimental Sundays "Celebrate Summer" Blog Hop


Welcome to the Sentimental Sundays “Celebrate Summer” blog hop. Tuesday, June 21st, is the official first day of summer in the northern hemisphere and we are ready for all the summer fun to begin. For our friends down under who are moving into their winter months and may not feel like creating a summery project, they may be making “Sparkly or Shimmery” projects. What girl doesn’t like her bling?

You should have arrived here from Sentimental Sundays challenge blog. If you didn't arrive from there and would like to join in the hop, please jump back there to start at the beginning.


For my project, I did a little sparkle and a little summer on this book box (tutorial). I just love the fairies over at The Emerald Faerie Garden. This is Ally and Beeble. My sentiment is from Raindrop Echo Designs Flowers In Bloom Sentiment set.

The fairy's wings are covered with Stickles and I have added flatback rhinestones around the sentiment and to the inside cover of the box.


I have hand-stitched both inside and out. Down the spine on both the inside and out, I have stitched starbursts. The flower is a singed edge flower (I'll be adding a tutorial on these on Tuesday so be sure to check back). [EDIT: Tutorial Here] The center is a brad that was made with my i-Top Tool using yellow fabric and gold tulle.


We hope you will join in our “Summery or Sparkly” (plus a sentiment) challenge this week. Our sponsor is the marvelous Ann Vento of Raindrop Echo Designs. This prize will be four INDIVIDUAL sentiment sets from the Raindrop Echo Designs Whimsy Stamps Digital Collection.

Your next stop on the hop is Ann English. If you should happen to get lost along the way, you can find the blog hop list over at the Sentimental Sundays challenge blog. Don't forget to leave comments along the way because there are 3 mystery DT members who will each choose a winner from the comments left on their blog hop posts. The winners will each win a $10 gift certificate to Whimsy Stamps! The hop ends on Friday, June 24th at midnight EST. The winners will be announced on the Sentimental Sundays challenge blog on Sunday, June 26th. So, hop on over to the next stop and good luck!


Thank you so much for stopping by.

Heather


I have checked the challenge lists over at Feline Playful and would like to enter this into the following challenges:

Just Some Lines 2W, SIO - Spots & Dots 
Sweet Stampin - 2E, must Stamp -  Things With Wings 
Crafts 4 Eternity Recipe Challenge - 3E - Use embellishments starting with "R". (ribbon)
Crafty Catz - 1E - Fancy folds.
Delicious Doodles - 3E, SIO - Things that flutter.
Fairy Knoll - 2E, SIO - Sparkle.
Inspire Me Fridays - Always anything goes.
Simply Create - 2W - Wings.
AiFactory - 1E, SIO -  Summer fun.
Art Impressions Stamps Challenge - 1E, SIO -  Buttons and/or bows.
Aud Sentiments Challenge - 2W - 2nd week - Summertime.
C.R.A.F.T. 5E - Stitching.
Crafty Purple Frog - 2W, SIO - 2nd week - Favourite things. (Handmade Flowers, Stitching)
Digi Doodle Shop's Best - SIO - Stitching.
The Rubber Cafe - 1E, SIO - Summer.
Southern Girls - 2W, 1E - Anything goes.
Alota Rubber Stamps - 2W, SIO, posted on the 1st & 16th -  Summertime
By the Cute & Girly - M, 1E/craft type, posted on the 1st - In the garden
Emerald Faerie Garden - 2W, 3E, SIO, posted on the 1st & 15th - Challenge #2: Petals
Crafting for all Seasons - 2W - #3 Summer
Crafts and Me - #39 Bling
Divas by Design - 2W, 2E - #4 anything but a card
Little Darlings Challenges - 2W, SIO - #1 Summer (2nd week)
My Mum's Craft shop - 3E - #10 spots
Anything Goes Challenge - 2W, 1E - #43 Here Comes Summer 
Creative Card Crew - Ribbons & brads
SCACD Friends With Heart - 1E, SIR - #11 Summer Fun
Tuesday Throwdown - #53 Chose 3 past Challenges from list on Blog (button on sidebar) (Stitching, DIY (make your own embellishments, Anything But a Card)
Craft Your Passion - It's Magical
Forever Friends - 2W, SIO, must include animal - Spots & dots.
Hooked on Crafts - 2W, SIO - Anything goes.
Pollycraft - SIO - Ribbon and Flowers
There's Magic in the Air - SIO - Pick 2 from: Flowers, Ribbon, Pearls/Gems and/or Die Cuts.
Pals Paper Arts - Sketch*.


Monday, May 30, 2011

Marvelous Monday at Shelly's Images

Welcome to another Marvelous Monday at Shelly's Images! This week we are showcasing Flower Girl which is on sale in the Shelly's Images Store. I've colored my image with ProMarkers and distressed the edges. My flowers are burnt edge flowers, but this time I layered a satin, a smooth polyester and tulle in pink and chocolate. My eyelets are from Eyelet Outlet. Be sure to stop by the Shelly's Images Blog to see what the other girls have made for today. Our guest designer is Laura Visser Anderson. Thanks for stopping by!

I've checked the lists at Feline Playful and  would like to enter this into the following challenges:


Paper Sundaes - 3E, C10 -  Vintage or shabby chic
Simply Create - 2W - 2nd week - Special day/event.
Totally Papercrafts - Pink & girly.
AiFactory - 1E, SIO - Pretty in pink.
Paper Romance - SIO - Distressing.
Amber's Crafts and Stuff - 1E - #11 Vintage
I Love Promarkers - Must use Promarkers - #67 pearls
Digital Tuesday - include a digital element - #112 Add Some Texture
Paper Take Weekly - Pale, Pretty Pastels

Wednesday, May 25, 2011

Pati in Peach


 Happy Wednesday! I got some more colors of ProMarkers for my birthday and one of the color families I was happiest to get was the peach color family. This is an Elizabeth Bell digi called Pati's Kisses. My papers are digital papers from Sherry K Designs. I made the flower on the front with burlap, polyester fabric and gold tulle. I singed the edges of the polyester fabric and tulle. I've hand-stitched around the edges both inside and out. My sentiment is a freebie from Paper Dreams of Mine.


 My flower on the inside is a burnt edge flower with a button center. My ribbon is from Really Reasonable Ribbon. I did actually put ribbon on the front, but completely covered it up, lol!


I would like to enter this into the following challenges:


B 'n W Challenges – Anything Goes

KB Cute Monday – So Girly
Pile It On – Bears
Really Reasonable Ribbon – Anything Goes

Crafting for all Seasons - 2W - Anything goes
House That Stamps Built - 2W, SIO - Stitching
I Love Promarkers - Must use Promarkers - #67 pearls
Paper Shelter Challenge - 3E, SIO - #15 anything goes
Sisterhood of Crafters - 2W, 3E - buttons 
Truly Scrumptious - 2W - 2nd week -  #57 Anything Goes 
Clear It Out! - 2W - 2nd W - Projects using Colouring Mediums
Creative Card Crew - Anything Goes
Digital Tuesday - include a digital element - #112 Add Some Texture
Paper Take Weekly - Pale, Pretty Pastels
Promarker Challenge - must use promarkers - #101 Use '2' of Things (2 DPs, 2 Flowers)
Tuesday Throwdown - #50 Stripes
Crazy Challenge - 2E - 1,2,3 recipe (1 image, 2 Dps, 3 pearls)
Lexi's Creations - 2W - 2nd week - Spots and/or stripes
Make it Monday - Always anything goes
There's Magic in the Air - SIO - Make your own flowers
I Did It Creations - Anything Goes 
Stamptacular Sunday -  BEAR Necessities
2 Sisters - #40 Use A Digi
Crafty Emma - E3 - #37 Embellish It  (flowers, ribbon, pearls)
ECP Challenges - 2W - 2nd W -  #38 Pastel Colours 
Mami Doodles - 2W, SIO, JFF - 2nd week - Spots and/or stripes.
Digi Doodle Shop's Best - SIO - Embossing.
Deconstructed Sketch - Sketch*

Tuesday, May 24, 2011

Right Side Up


 For this card, I wanted to enter the color challenge over at Do You Stack Up which is Sea Glass Blue, Celery and White. However, I just couldn't pull it together without the brown. I love this little image from Stretch n' Bubbles and the sentiment that comes with it is just darling. I have colored this with ProMarkers and stitched around the edges. My flowers are more burnt edge flowers and my paper is from K & Company.


I would like to enter this into the following challenges:

Make it Monday - Always anything goes
Stamps & Fun = Creativity - Flower Power
There's Magic in the Air - SIO - Make your own flowers
Woodware USA - 2E - Anything Goes
I Did It Creations - Anything Goes 
Stampin' Sisters in Christ - an Encouragement project, plus a touch of silver
2 Sisters - #40 Use A Digi  
Fairy Knoll - 2E, SIO - Flowers.
Inspire Me Fridays - Always anything goes
4 Crafty Chicks - Brads.
CCEE Stampers - 1E, JFF - Flowers.
Crafting for all Seasons - 2W - Anything goes
Creative Belli - 2W - 2nd W -  #117 Anything starting with S  (stitching)
I Love Promarkers - Must use Promarkers - #66 Animals 
Little Red Wagon - #81 Use a Tree in your Project
Paper Pretties - SIO -PPC154 Flowers 
Penny's Paper-Crafty - 2W - 2nd W - #53 Anything Goes
Truly Scrumptious - 2W - #57 Anything Goes 
Crazy Challenge (1 image, 2 design papers, 3 flowers)
Passion for ProMarkers - All the Twos (2 owls, 2 design papers)


Eat Sleep Stamp - Sketch*.

Wednesday, May 11, 2011

Another Puddle Jumper Shelby


This is my third post today... I'm on a roll, lol! This is Puddle Jumper Shelby from By Lori Designs. I picked up the paper at a craft rummage sale, so I don't know what kind it is. My flower is a burnt edge flower. I made an I-Top Brad for the center so that I could have a pink and red flower to match her dress. The sentiment is from TLC Creations. My dies are from Spellbinders. All my bling and glitz is on the inner panel. :)


I would like to enter this into the following challenges:

Flourishes - Anything Goes
Paper Take Weekly - Punches Or Die-Cuts 
Top Tip Tuesday - 3E - Flower Frenzy 
Tuesday Throwdown - Die-cuts 
Use It Tuesdays - 2W - Bling
DDH Challenges - 2W - Bling
Incy Wincy Designs - Mother's Day/Girlie
Kaboodle Doodles - Lots of Layers
Make it Monday - Anything goes
Crafty Pad - SIO - Spots and Dots
Creative Inspirations - 2W - Glitzy and Bling.
Sentimental Sundays - must include a Sentiment - Anything goes
Scrappy Frogs - 3W - Anything goes
Catch The Bug - 3E, SIO -  Anything Goes
Crazy 4 Challenges - #C4C86 - Lots of Flowers
Word Play Weekend Challenge - JFF - Flowers - as image, embellies or part of sentiment.
Fairy Fun Fridays - 2W, SIO – #52: For the girls.
Raise The Bar - Challenge #65: Flower power.
Stamp Something - Use a digi.
Wags 'n Whiskers - 2W, SIO - 2nd wk - Challenge #53: Use die/punch.
Paper Romance - SIO -  Challenge #49: Use your favourite die.